")


Want to add an eye-catching accessory to your hat to instantly transform a plain hat into a stylish one, but don’t know how to go about it? Don’t we got you covered.
When it comes to adding a personal touch to winter wear, that you can do easily even if you are not a highly skilled knitting enthusiast, you can’t go wrong with sewing a pom pom for your wardrobe.
It’s a delightful and straightforward DIY project that anyone can start.
In this guide, Let me take you through all the steps of sewing a pom pom properly onto your hat, plus some helpful tips and tricks along the way.
Shall we begin?
1. Why Add a Pom Pom to Your Hat?
If you are still not convinced let go over some basic benefits a pom pom can bring to your aesthetic look
- First and foremost comes the fact that it can bring a touch of whimsy and individuality to your chosen hat regardless of style. Here whether you prefer vibrant or subtle colors as your core aesthetics, you can find or sew a pom pom with our guide that suits your style perfectly.
- Second is warmth!. Depending on the region you are planning to use your hat, on top of its aesthetic appeal, it actually can add a proper bit of warmth to your hat. Means they are both, in a sence, fashionable and functional at the same times.
- Last but not least is the customization factor! When it comes to personalization of an accessory like a hat, you have limited options unless you rely on technology for printing a premade design. However, sewing it yourself helps you bypass everything, you can easily make your own pom match a variety of colors and give it more personalized bespoke textures.
Now, let’s get to the fun part – sewing a pom pom onto your hat.
2. Preparing Cardboard
Okay on the first step, Cardboard preparations! While it is most often consider a optional step once become a pro, but if you are starting out this cardboard templated really be a game changer to keep you grounded during the process
here’s a simple guide using cardboard templates:
2.1 Cut Two Cardboard Circles
Alright, on to the actual first step, begin by determining the size of your circles. Why? Because it will determine the size of your pom pom.
Most often people need customized sizes but if you do not know what to go with, you can always rely on the classic-sized pom pom. It is 3-4 inches in diameter and works well.
So, Cut a small circle in the center of each cardboard circle.
Alright now, hold the two cardboard circles together. Remember you only wanna use one hand here to hold it properly. Now start wrapping your chosen yarn around them covering everything.
Simply, the more you wrap the cardboard in this essential stage, the denser your pom pom will be.
One tip here is to leave a bit of yarn hanging out; you’re gonna need to tie the pom pom together, later on .
2.3 Tie a Knot:
Moving on to attaching them to each other, just carefully insert a piece of yarn between the two cardboard circles and tie a tight knot. Done right, the knot secures your pom pom properly..
Finishing it gets your sharp scissors ready. Now cut the yarn loops along the edges of the cardboard circles carefully.
Be sure to cut through all the loops. Then, give your pom pom a good shake to fluff it up.
3. Thread the Yarn Needle
Okay on preparing the needles. Now, thread a length of yarn onto your yarn needle. The length depends on your preference, but a generous amount, around 10-12 inches, should suffice for most of the designs.
4. Position the Pom Pom
Moving on to the final check before the actual sewing process begins, You wanna begin by decide where you want to attach the pom pom on your hat.
If you want to go with the typically route then you may wanna check out the center for the main positions. It is called hat’s crown, It is a great spot.
Once done, just hold the pom pom in place to get an idea of the final look.If you think pom are a little smaller this is the time add a little bit of yarn to buff it up.
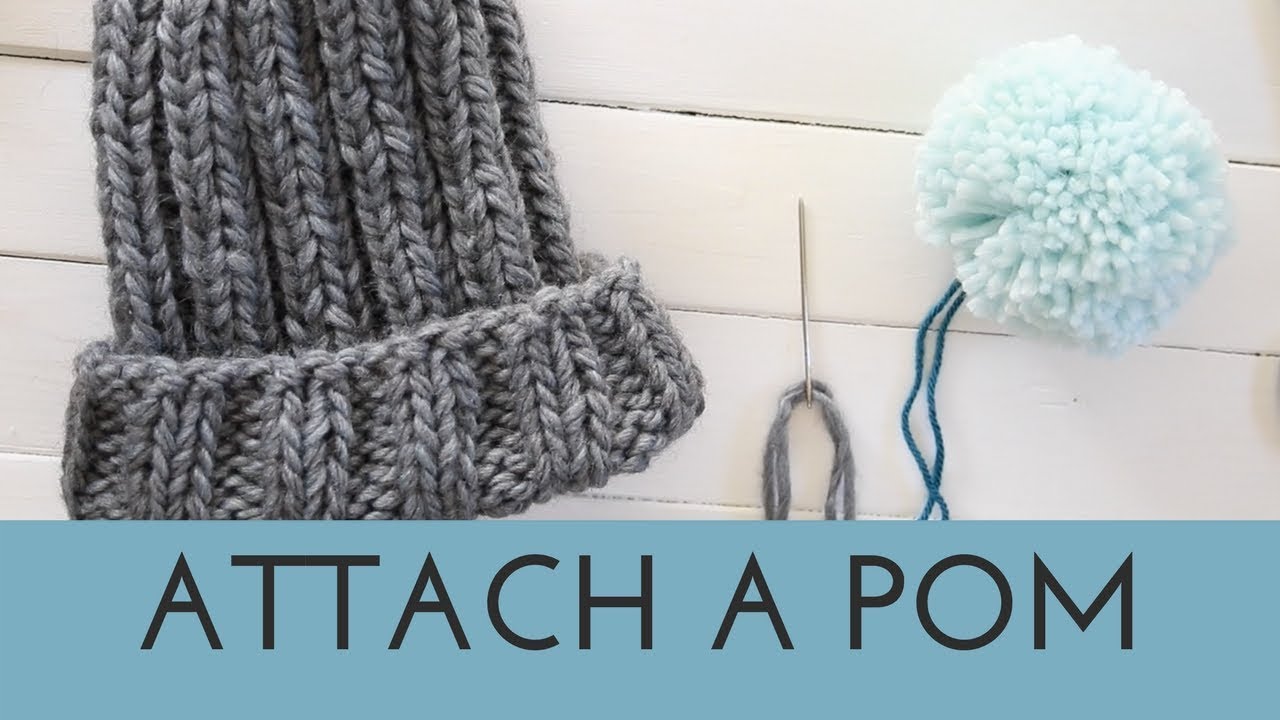
5. Secure the Pom Pom
Alright, it’s time to jump into the actual sewing process.
Now, when it comes to attach a pom to your hat. The process of pom to a hat involves careful consideration before you begin wrapping, and your insights would be valuable.
- Now, then you have everything ready and you properly inspect the look it will give once properly attached, begin by Inserting the needle through the center of the pom pom.
- Next comes the position of the pom pom on the hat where you’d like it.
- Moving on, push the needle through the hat and let it come out from the inside.
- Alright, now, carefully sew the pom pom onto the hat. How do you do this? By simply stitching through the center a few times. But you wanna make sure it’s securely fastened. Otherwise you need to redo it again.
6. Make it Shine
First and foremost! Double-check and Tie a knot with the yarn tails inside the baby hat. This is properly ensure that the yarn pom poms are firmly attached.
Second: get your scissors ready and trim any excess yarn you found. You wanna be extra careful here, not to cut the yarn that attaches the pom pom to the hat.
Third, After you are satisfied with your sewing and the pom pom location looks good on the hat. Then you definitely wanna give it a gentle shake to fluff it up. It will help you adjust all the strands until you’ve achieved that final shape.
Now, just wash hat then add beads, buttons, or even some decorative band you saw fit around the base of the pom pom. It will help you take your bespoke vibe further.
Pro Tip; You wanna remember to keep and maintain the quality of your creation by periodically washing the hat, being cautious not to compromise the integrity of the yarn pom pom.
Closing Thoughts
Alright, Good Job! You’ve successfully followed the steps on how to sew a pom pom onto a hat, By securing attachment of the yarn pom pom to your chosen hat you easily extended its charming touch for your next winter preparations.
")


3 Comments
This guide to sewing pom poms onto hats is a game-changer for anyone looking to add a touch of style and personality to their winter wardrobe! The step-by-step instructions are not only clear but also inspiring, making it easy for both beginners and seasoned crafters to follow along and create something truly unique. Kudos to the author for making the process so enjoyable and accessible. I can’t wait to try these techniques and add a playful flair to my winter wardrobe!
This guide really helped me with making pom poms! It explained the steps in a way that I could easily follow, like cutting through the loops and giving the pom pom a good shake for fluffiness. Deciding where to put the pom pom on my hat was made easy, especially with the tip about the hat’s crown. I liked holding it in place to visualize before finalizing, and adding a bit more yarn if needed was a smart idea, making the whole process more enjoyable for me.
Both novice and experienced crafters will find it simple to follow along and produce something genuinely one-of-a-kind thanks to the motivating and unambiguous step-by-step instructions. Congratulations to the author for making the procedure so approachable and pleasurable. I’m eager to put these strategies to use and liven up my winter outfit!