")


Have you ever been sewing and all of sudden, out of nowhere, your sewing machine starts freaking out and your stitches turn into a total mess? If so, then it’s more than likely a sewing machine timing issue. But don’t worry! Today we’re going to learn how to fix timing on sewing machine. So grab your tools and get ready because we’re about to save your good old sewing machine!
1. Timing in Sewing
Before we start this adventure let’s talk about what timing is. Timing is when everything syncs up. It takes two to tango, right? Well, this is the same concept but with fabric and thread. Once your timing goes awry you end up with uneven stitches or just a straight mess of fabric.
2. Signs You Have A Timing Issue
2.1 First Thing’s First: Is It Actually The Timing?
Before we start fixing the entire machine let’s go through some basic troubleshooting. Look at your needle first and make sure it’s secure and threaded correctly as well as if you’re using thread and fabric that actually work together. If you’re still unsure after checking all those things out, then let’s move onto running a quick test.
2.2 Timing Test 101: Is Your Machine in Sync?
Prep Work:
Remove the base cover, bobbin case and switch plate; Do not remove the needle though.
Slowly turn the handwheel and see if the hook catches the thread easily.
With an ruler/scale:
Find a ruler or scale that works for you
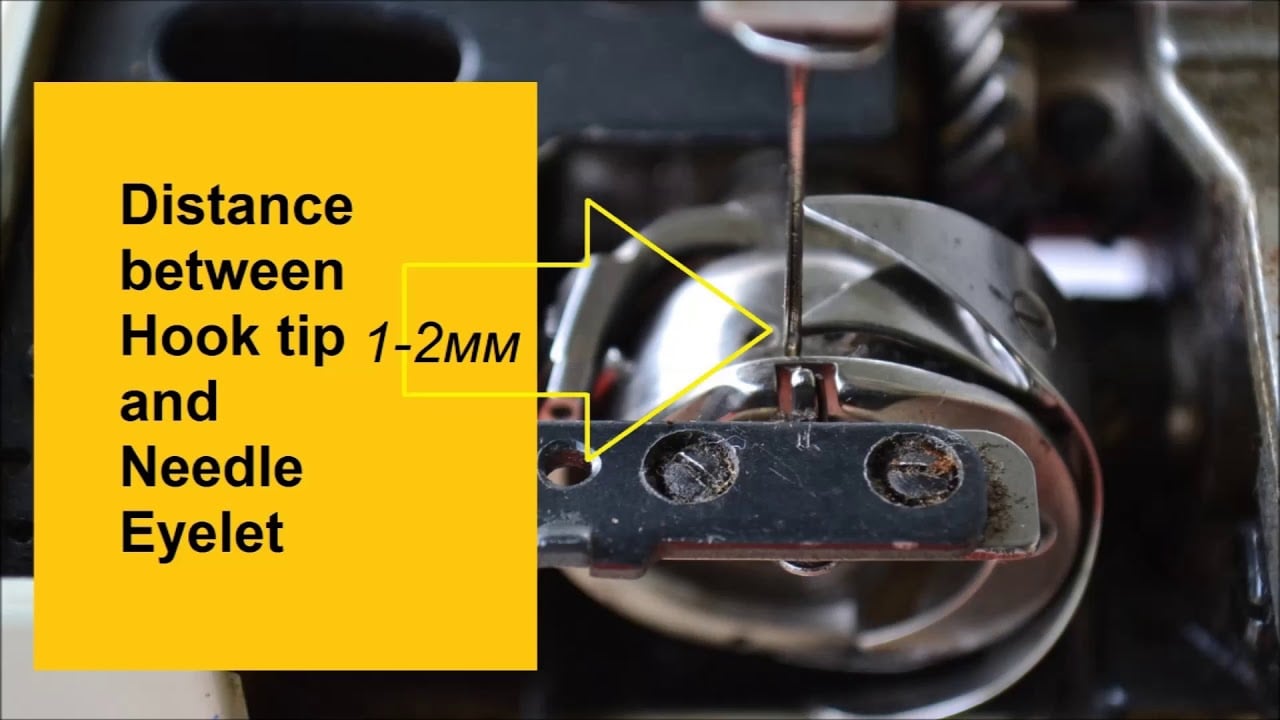
With the handwheel lower the needle to its lowest position then the hand wheel to raise it up 2.4mm (or 3/32 of an inch).
The needle should align with the hook above its eye. If it doesn’t then you’ll have to roll up your sleeves because there’s some work ahead of you
3 Fixing Fiesta: Step-by-Step Guide to Adjusting Timing
Now that we know timing is the problem, now it’s time for us to fix it. Do these steps to get your sewing machine back up and running.
3.1 Step I: Get Your Machine Ready for the Ride
Change your machine’s stitch to either a straight stitch or a wide zigzag. Take out the needle threaded bobbin case, base cover, switch plate and needle-bar cover. Keep close to you a small screwdriver, sewing machine oil and anything else you see fit.
3.2 Step II: Set the Needlebar
Most sewing machines come with marks that show which height is suitable for the needlebar. Put together depending on your settings or reference guide to use and figure out how to loosen your needlebar as well as how low or high should it be adjusted according to what your manual says or just use the handwheel. Raise the needle up 2.4mm making sure its eye is at the right distance below the hook’s point.
3.3 Step III: Hook Timing Adjustment
The distance between the hook and sewing needle can vary from machine to machine and manufacturer to manufacturer. To start, use the handwheel and lower the needlebar down as far as it will go. Once it is near the bottom, untighten any screws in the base of your machine until they almost fall out. This should give you enough room to adjust the two parts you want to separate them by quite a bit but not too much. Depending on your sewing machine brand, there should be a gap of 0.01-0.16cm or 0.04-0.1mm.
3.4 Step IV: How Will You Know If It’s Working?
Keep open just where your bobbin goes into its case area so you can see everything while turning it with your handwheel slowly in order for it catch onto the thread securely with no missing or skipping involved in this process at all; If you’ve done everything right then you’ve put an end to your timing issues.
3.5 Step V: Give Your Machine Some TLC
Once you’ve gotten the hang of it, congratulations, now it’s time to show your sewing machine some tender loving care. Grab a clean cloth and some sewing machine oil to give your machine a good cleaning and oiling. If you need guidance on how to do this, check our other guide.
3.6 Step VI: The Final Stitch (Test)
Thread your needle and test your adjustment on a small piece of fabric. The stitch should stay even throughout with no skipping or missing stitches. You needle shouldn’t break or get caught in the fabric either. If everything is going well and looks good, then you’re ready for your next big project.
4 Tips & Tricks for Industrial Sewing Machines:
If you’re dealing with an industrial sewing machine things are going to be a bit different from what we just covered above.
4.1 Timing Tales from the Industrial Front:
Each industrial sewing machine is different and will have it’s own unique timing dance sequence that you’ll need to learn. So make sure to check your machine’s user manual for those specifics.
4.2 Setting the Timing Stage:
For most machines, place the looper or hook tip 1/16” above the needle eye of the needle with a gap based on thread size and machine size . Use a small ruler for precision as small adjustments can make huge differences in timing.
5. Still Struggling? Pros Got Your Back!
Sometimes no matter what you do or how much you try, things just don’t work out how they’re supposed to. If that’s the case here, don’t worry too much just yet because there might be something more sinister at play than timing in ruining your sewing adventures. Consider consulting a professional repairer to get everything back on track.
Closing Thoughts!
You’ve got it, the final guide to timing on your sewing machine. Like anything else in life sewing is going to be a dance and timing is key to a flawless performance. So with a little patience and these step-by-step instructions we just gave you, you’ll be back to making beautiful stitches in no time. Happy sewing!
")

